spacebridgehabpcb
Publiceigenlucy/spacebridgehabpcb
Loading 3D model… large boards can take a moment.
SpaceBridge HAB PCB
High Altitude Balloon (HAB) PCB Tracker with cutdown mechanism, GPS, environmental monitoring, LoRa telemetry and particle detection capabilities.
Created by Lucy Moglia [email protected]
Table of Contents
Overview
The SpaceBridge HAB PCB is a comprehensive tracking and instrumentation system for high altitude balloon experiments. It integrates multiple subsystems including power management, telemetry, GPS tracking, environmental monitoring, and a particle counter based on CERN open source hardware.
Project Structure
| Module | Source File | PCB Layout | Description |
|---|---|---|---|
| Mainboard | mainboard.ato | layouts/default/default.kicad_pcb | Final PCB incorporating all submodules |
| MicroMPPT | micromppt/elec/src/micromppt.ato | micromppt/elec/layout/default/micromppt.kicad_pcb | 5W MPPT battery charger with embedded set point adjustment algorithm |
| Particle Counter | particle_counter.ato | layouts/particle-counter/particle-counter.kicad_pcb | Alpha particle detector based on CERN open source hardware kit |
| Cutoff Mechanism | cutoff.ato | layouts/cutoff/cutoff.kicad_pcb | Balloon cutoff circuit using lithium hybrid supercapacitor discharging through nichrome wire |
| BQ24045DSQR BMS | bq24045dsqr/elec/src/bq24045dsqr.ato | bq24045dsqr/elec/layout/default/bq24045dsqr.kicad_pcb | 5V 1A single cell LiPo/Li-ion charger + BMS |
| TPS63020DSJR | ~/.ato/modules/tps63020dsjr/elec/src/tps63020dsjr.ato | ~/.ato/modules/tps63020dsjr/elec/layout/tps63020dsjr.kicad_pcb | 1.8V-5.5V In/Out 4A boost-buck converter (5V from Vbat) |
Block Diagram
Original Block Diagram
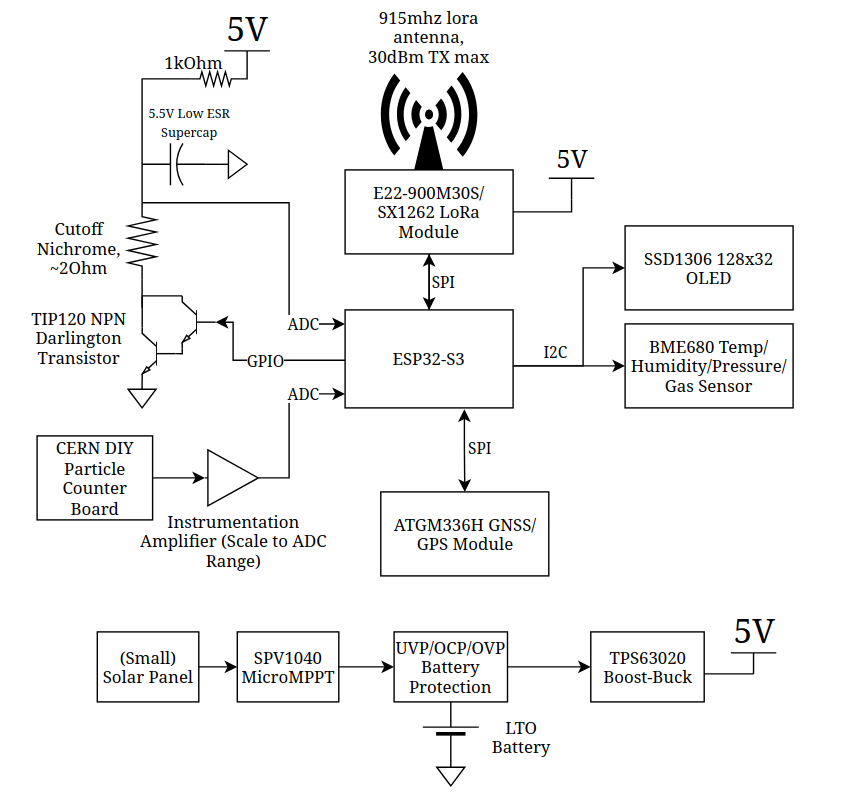
Mermaid Diagram
graph TD
    %% Power System
    Solar["Solar Panel"] --> MPPT["SPV1040 MicroMPPT"]
    MPPT --> BattProt["UVP/OCP/OVP Battery Protection"]
    BattProt --- Battery["LTO Battery"]
    BattProt --> BoostBuck["TPS63020 Boost-Buck"]
    BoostBuck --> Power5V["5V Power Rail"]

    %% ESP32 Microcontroller (Central)
    ESP32["ESP32-S3"]

    %% 5V Devices
    Power5V --> LoRa["E22-900M30S/SX1262 LoRa Module"]
    Power5V --> ParticleCounter["CERN DIY Particle Counter"]
    Power5V --> CutoffSystem["Cutoff System"]

    %% Cutoff System Components
    CutoffSystem --> Supercap["3.5V Low ESR Supercap"]
    CutoffSystem --> Nichrome["Nichrome Wire ~20Ω"]
    CutoffSystem --> TIP120["TIP120 NPN Darlington"]

    %% I2C Devices (3.3V)
    ESP32 -- I2C/IO6+IO7 --> OLED["SSD1306 128x32 OLED"]
    ESP32 -- I2C/IO6+IO7 --> BME680["BME680 Sensor"]
    ESP32 -- I2C/IO6+IO7 --> GPS["ATGM336H GNSS/GPS"]

    %% SPI Connections
    ESP32 -- SPI/IO10-13 --> LoRa

    %% GPIO Connections
    ESP32 -- GPIO0 --> Supercap["SC_GATE (Supercap Control)"]
    ESP32 -- GPIO1 --> TIP120["CUTOFF_GATE (Nichrome Control)"]

    %% ADC Connections
    ParticleCounter -- ADC/GPIO2 --> ESP32

    %% Antenna
    LoRa --- Antenna["915MHz LoRa Antenna (30dBm TX max)"]

    %% Styling
    classDef power fill:#f96,stroke:#333,stroke-width:2px
    classDef sensor fill:#bbf,stroke:#333,stroke-width:1px
    classDef communication fill:#f9f,stroke:#333,stroke-width:1px
    classDef controller fill:#9f6,stroke:#333,stroke-width:2px

    class Solar,MPPT,BattProt,Battery,BoostBuck,Power5V,Supercap power
    class BME680,ParticleCounter,GPS sensor
    class LoRa,Antenna,OLED communication
    class ESP32 controller
Features
- Power Management: Solar charging with MPPT, battery protection and 5V regulation
- Communication: 915MHz LoRa radio for long-range telemetry (30dBm TX max)
- Positioning: ATGM336H GNSS/GPS module
- Sensors:
- BME680 temperature/humidity/pressure/gas sensor
- CERN DIY particle counter for radiation detection
- Display: SSD1306 128x32 OLED screen
- Control: ESP32-S3 microcontroller
- Recovery: Nichrome wire cutdown mechanism for payload separation
Getting Started
Building the Project
-
Clone the required submodules
git submodule update --init --recursive -
Build the project to select components based on JLCPCB availability
ato build -t all -
Complete/review the layout with KiCad Standalone PCB editor
-
Gerbers/PCBA files are generated through an Actions run on a commit
Installation
Linux Installation
-
Install uv
-
Install KiCad with your preferred package manager (apt for Debian, pacman for Arch, etc.)
-
Install atopile as a tool with uv (Python 3.13.2 recommended):
uv tool install atopileAlternative installation method:
- Clone the main atopile repo
- Remove the uv lock file:
rm uv.lock - Sync repo to dev release:
uv sync --dev - Compile atopile:
uv build - Install the binary:
uv tool install atopile-0.3.XX-cp313-cp313-linux-_x86_64.whl - Add the uv tools binary directory to your PATH (command depends on your shell, e.g., with fish):
fish_add_path /home/user/.local/share/uv/tools/atopile/
-
Check your version:
ato --version -
Configure the atopile plugin:
ato configure
Mac Installation
- Install Homebrew
- Install KiCad 9:
brew install --cask kicad - Install atopile with Homebrew:
brew install atopile/tap/atopile - Configure the atopile plugin:
ato configure
Visual Studio Code/Cursor Extension Install
Install the atopile extension into Cursor or Visual Studio Code.
No comments yet. Be the first to ask about this board.